Multi-Stage Generation: Z-Image to ZIT Refiner
Chain models for better results — generate with Z-Image base for prompt adherence, then refine with Z-Image Turbo for detail. Two commands, one pipeline.
Every image model makes tradeoffs. Fast models like Z-Image Turbo and Flux Schnell get you an image in 4 steps, but they sometimes drift from your prompt — colors shift, details get dropped, compositions simplify. Base models like Z-Image and Flux Dev follow your instructions more faithfully, but take 7-8x longer. Multi-stage generation gives you both: the accuracy of a base model and the detail polish of a fast one.
Why multi-stage?
Single-pass generation forces you to pick one end of the speed-accuracy spectrum. A 4-step turbo model generates fast but drifts from your prompt. A 30-step base model follows directions precisely but takes significantly longer per iteration.
Why do turbo models drift? Distilled models compress the denoising schedule into fewer steps, which reduces the cumulative influence of the text encoder’s conditioning signal. Each step does more work, but the prompt has fewer opportunities to steer the output. The result: good images that don’t always match what you asked for.
The insight from the ComfyUI community: you can use a base model for structure and color, then pass that image through a turbo model at low strength for detail refinement. The turbo model sharpens textures and cleans up noise without overriding the base model’s composition. In ComfyUI, this requires wiring up a multi-node workflow. In modl, it’s two commands.
If you’ve used SDXL, this pattern will feel familiar — SDXL shipped with a dedicated refiner model for exactly this purpose. The community eventually moved away from it because the refiner itself was mediocre. The difference here is that you pick your own models and control the handoff strength.
The Z-Image to ZIT pipeline
Stage 1 generates with Z-Image base at 30 steps for strong prompt adherence. Stage 2 refines with Z-Image Turbo at very low strength — just enough to sharpen details without reinterpreting the image.
The --strength parameter controls how much the refiner is allowed to change — 0.15 means “keep 85% of the input image, regenerate 15%.” When you omit --size, modl automatically matches the init image’s dimensions.
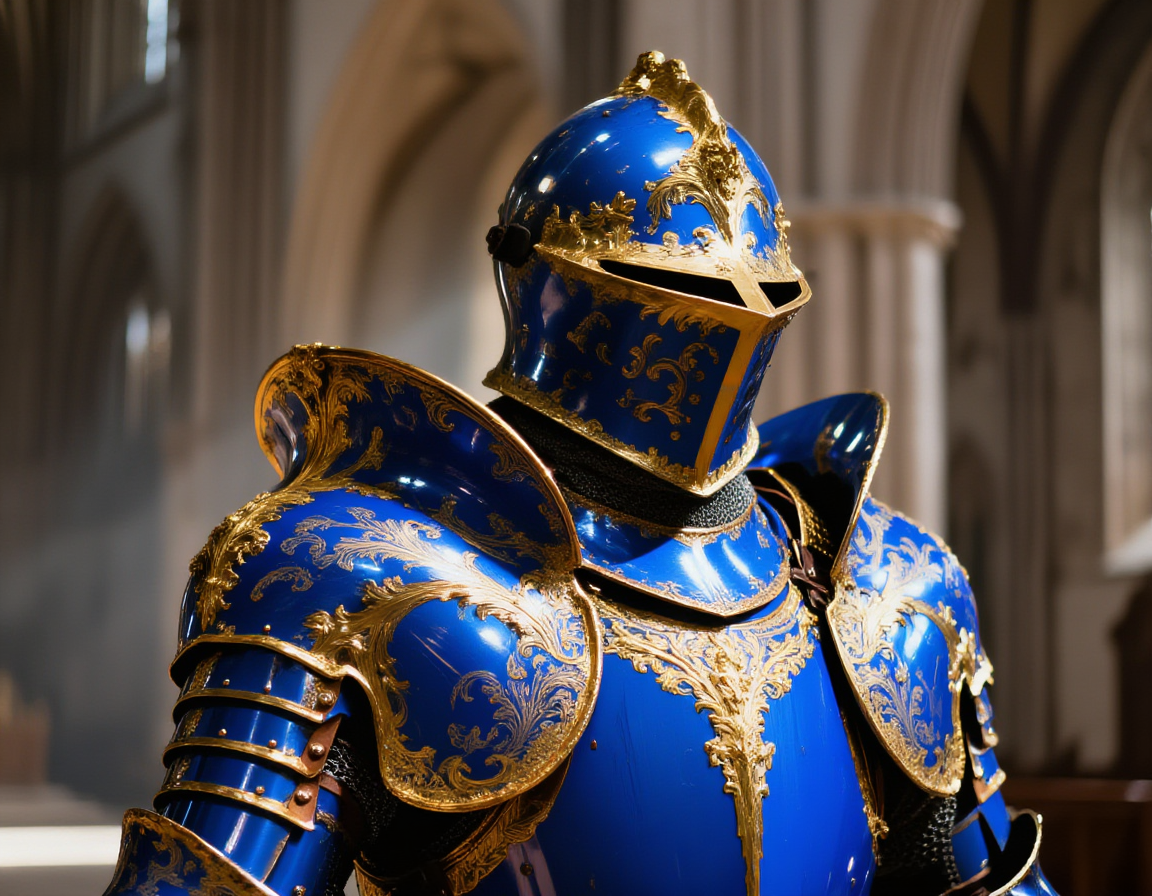
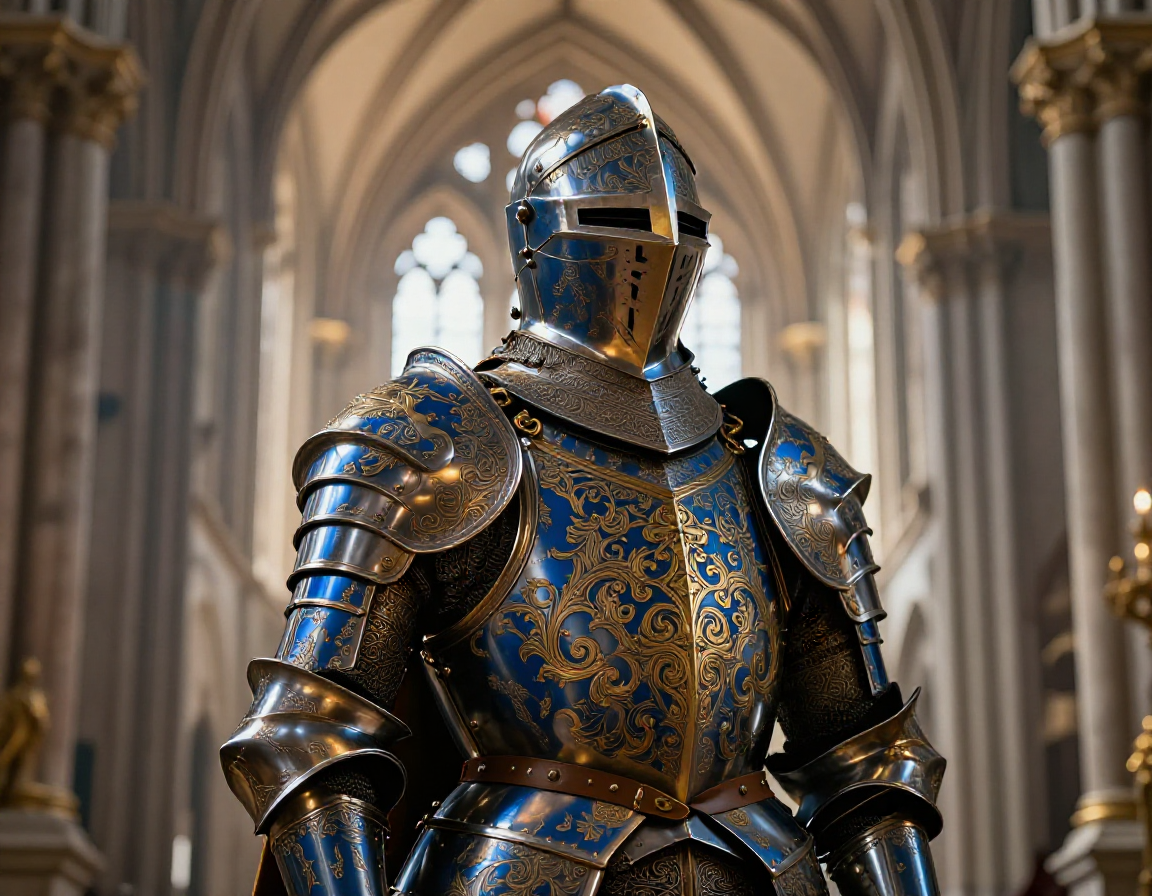
To see why this matters, compare Z-Image base against ZIT single-pass on the same prompt:

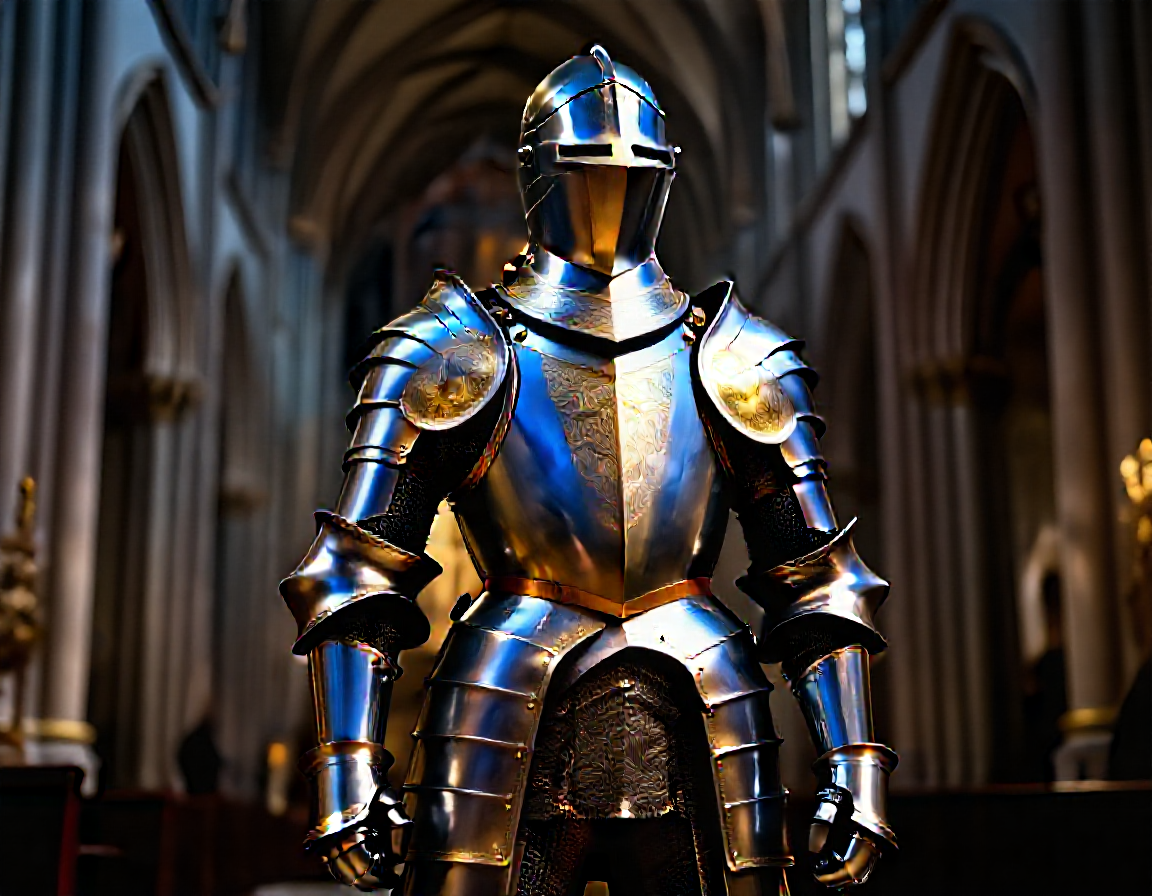
Same prompt, same seed. Z-Image base (30 steps) nails the blue and gold. ZIT (4 steps) went silver — fast but lost the brief.
ZIT produced a good image, but it ignored “blue and gold” and rendered silver armor instead. This is the turbo tradeoff — fewer steps mean fewer opportunities for the text conditioning to push the output toward what you actually asked for. The multi-stage pipeline avoids this: Z-Image base locks in the correct colors and composition, then ZIT polishes the details.
Strength tuning
Strength is the single most important parameter in multi-stage workflows. It controls how much the refiner model is allowed to deviate from the input image. Too low and you see no difference. Too high and the refiner takes over completely.
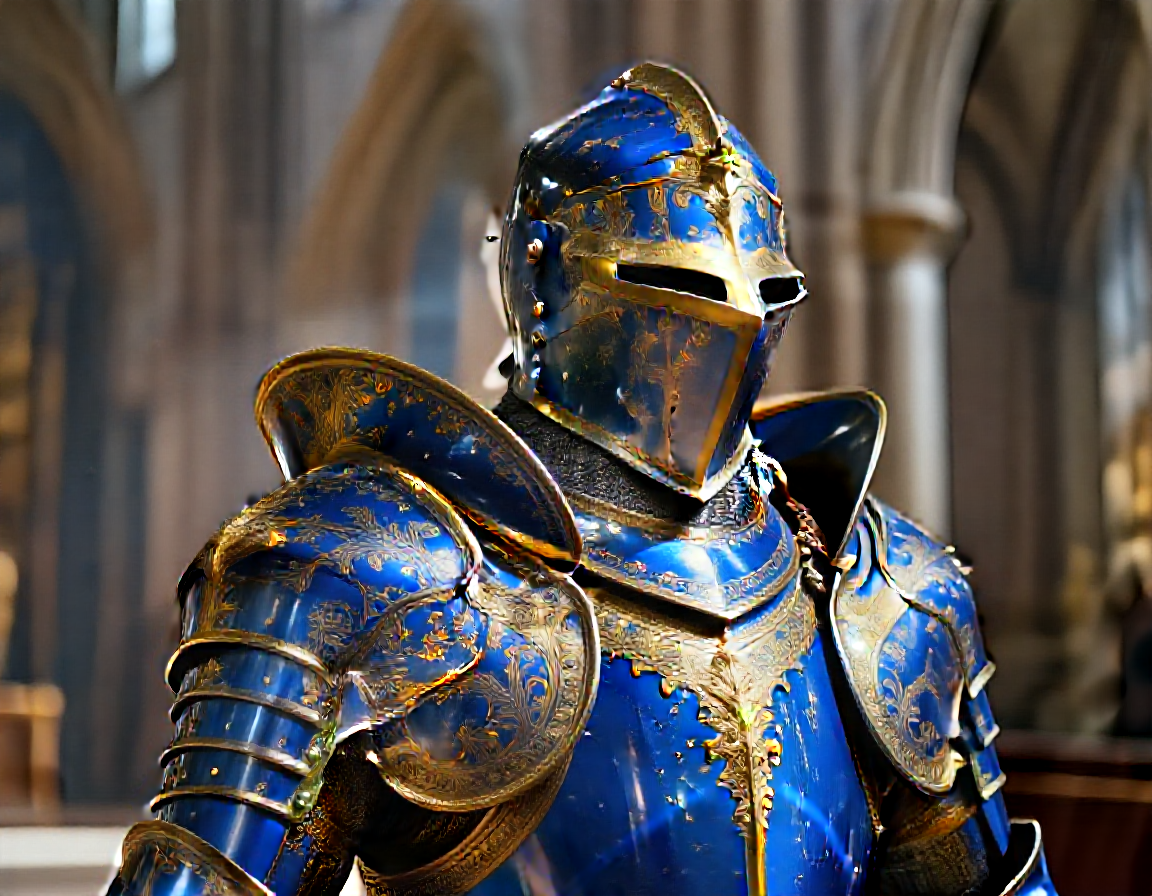
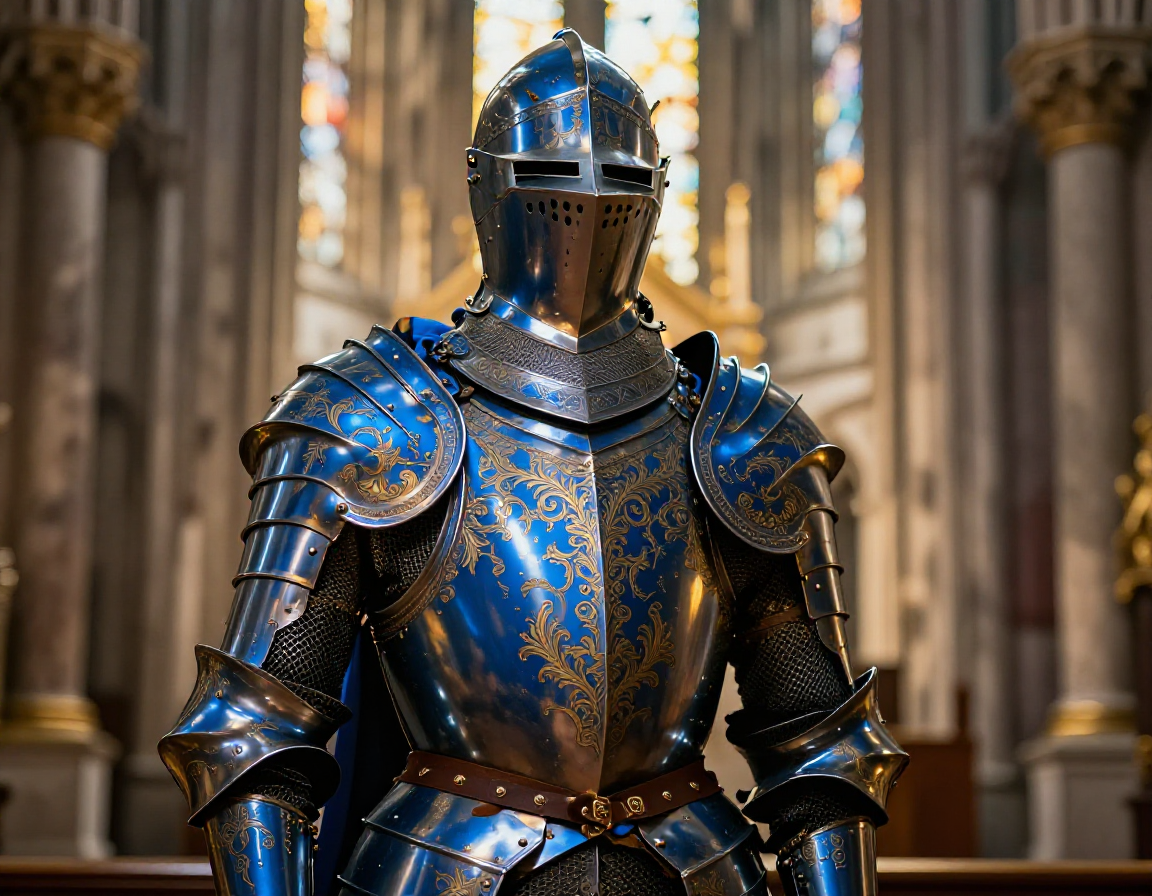
Here’s the Z-Image → ZIT pipeline at four strength values on the same knight image:

The useful range. 0.15 is nearly invisible — subtle sharpening. 0.25 is slightly more defined but still faithful to the base.

Too much. At 0.40 the helmet reshapes and gold turns weathered. At 0.60 ZIT has fully taken over — the base model's character is gone.
The useful range is 0.10–0.25. Above 0.40, the refiner model’s own tendencies dominate and you lose the advantages of the base model. If you’re seeing color shifts, composition changes, or new elements appearing, your strength is too high.
Prompts, seeds, and guidance across stages
A few things that matter when chaining models:
Prompts don’t have to be identical. Keep the subject and composition the same, but you can adjust the prompt in stage 2 to focus the refiner’s limited denoising budget. Adding detail descriptors like “highly detailed skin texture, intricate filigree, sharp focus” in stage 2 can help the refiner prioritize fine detail over broad changes. What you want to avoid is changing the subject or composition — that creates a conflict between the input image and the text conditioning.
Seed behavior: The seed in stage 2 controls the noise pattern for the regenerated portion. At 0.15 strength, most of the image is determined by the input, so the seed matters less. At higher strengths it matters more. If you want fully deterministic results, fix the seed in both stages.
Guidance scale doesn’t carry over. Each stage runs its own inference independently. Stage 1’s CFG/guidance scale is baked into the pixels it outputs — stage 2 starts fresh with its own guidance settings. For Z-Image, the default guidance (3.5) works well for both stages. If you’re mixing architectures, keep in mind that distilled models like ZIT often use CFG=1 or handle guidance internally, so cranking up --guidance in stage 2 may not help.
Cross-model refinement
The two-stage pattern isn’t limited to Z-Image and ZIT. You can use any base model for stage 1 and any img2img-capable model for stage 2. But cross-model refinement needs different settings than same-family refinement.
The community ComfyUI workflow that inspired this guide uses denoise 0.59 with 12 steps on the refiner — not 0.15. Same-family refinement (Z-Image → ZIT) works well at low strength because the models share a visual language. Cross-architecture refinement needs more room for the refiner to impose its character.
Here’s Flux Schnell and Chroma refined through ZIT at 0.5 strength with 8 steps and a detail-enriched prompt:
Flux Schnell → ZIT. Flux's composition is preserved, but ZIT adds its distinctive metal texture and sharpens the blue/gold engravings.

Chroma → ZIT. The gold filigree is more defined, cathedral details are crisper, while Chroma's blue tones carry through.
The difference from same-family refinement: you’re not just polishing — you’re blending two models’ strengths. The base model sets the composition and color palette, the refiner adds its own texture and detail character on top.
Cross-model refinement needs higher strength (0.4–0.6) and more steps (8+) than same-family refinement (0.10–0.25, 4 steps). Use a detail-focused prompt in stage 2 — add terms like “intricate metal detail, sharp focus, fine texture” to direct the refiner’s denoising budget toward surface detail rather than composition changes.
When you chain models from different families, there’s a pixel-space handoff: stage 1 decodes latents → PNG, stage 2 re-encodes PNG → its own latent space. That VAE round-trip has a small quality cost. Within the same model family (Z-Image → ZIT), latent-space handoff could avoid this — tracked in issue #18.
When to skip it
Multi-stage isn’t always worth the extra step. Two inference passes mean roughly 2x the compute time (and 2x the cost on a cloud GPU).
- Quick drafts — Single-pass ZIT or Schnell is fine for exploring ideas. Iterate fast, refine later.
- Style exploration — When you’re still figuring out the look, single-pass lets you try more variations in the same time.
- Turbo model already nails it — If ZIT gives you what you want in one pass, adding a stage doesn’t help.
- Prompt adherence matters — Specific colors, compositions, or details that turbo models tend to drop.
- Final output quality — Two-stage + upscale gives you the best possible result from the same models.
- LoRA consistency — Base models respond more predictably to LoRAs. Generate with LoRA on the base model, then refine.