Train Your First Style LoRA
Go from a folder of kids' drawings to a working SDXL style LoRA — dataset creation, captioning strategy, training, and testing.
What you’ll build
By the end of this guide you’ll have a style LoRA trained on SDXL that turns any prompt into children’s crayon-style art. The same workflow applies to any visual style — watercolor, pixel art, ink drawings, whatever you have images of.
Same prompt, same seed. The LoRA transforms the output into the children's drawing style from your dataset.
We’re using a real dataset: 47 kids’ drawings sorted by emotion (happy, sad, angry, fearful). The entire process takes about 20 minutes of active work plus training time.
A style LoRA learns a visual aesthetic (line quality, color palette, texture) rather than a specific object or person. This changes how you caption, how many steps you need, and what rank to use.
Prerequisites
- modl installed —
curl -fsSL https://modl.run/install.sh | sh - A base model — we’ll use SDXL:
modl pull sdxl-base-1.0 - GPU with 12+ GB VRAM — modl auto-quantizes for 24GB cards, works on 12GB with reduced batch size
- 30–100 images representing the style you want to capture
1. Create a dataset
Point modl at a folder of images. It copies them into the managed dataset directory, normalizes formats, and sets up the structure for captioning.
Your dataset is now at ~/.modl/datasets/kids-art/ with all images ready for captioning.
For style LoRAs, variety matters more than quantity. 30–60 diverse images showing different subjects in the same style work better than 200 images of the same thing. Our 47 images cover faces, houses, vehicles, families, and landscapes — all drawn in crayon by kids.

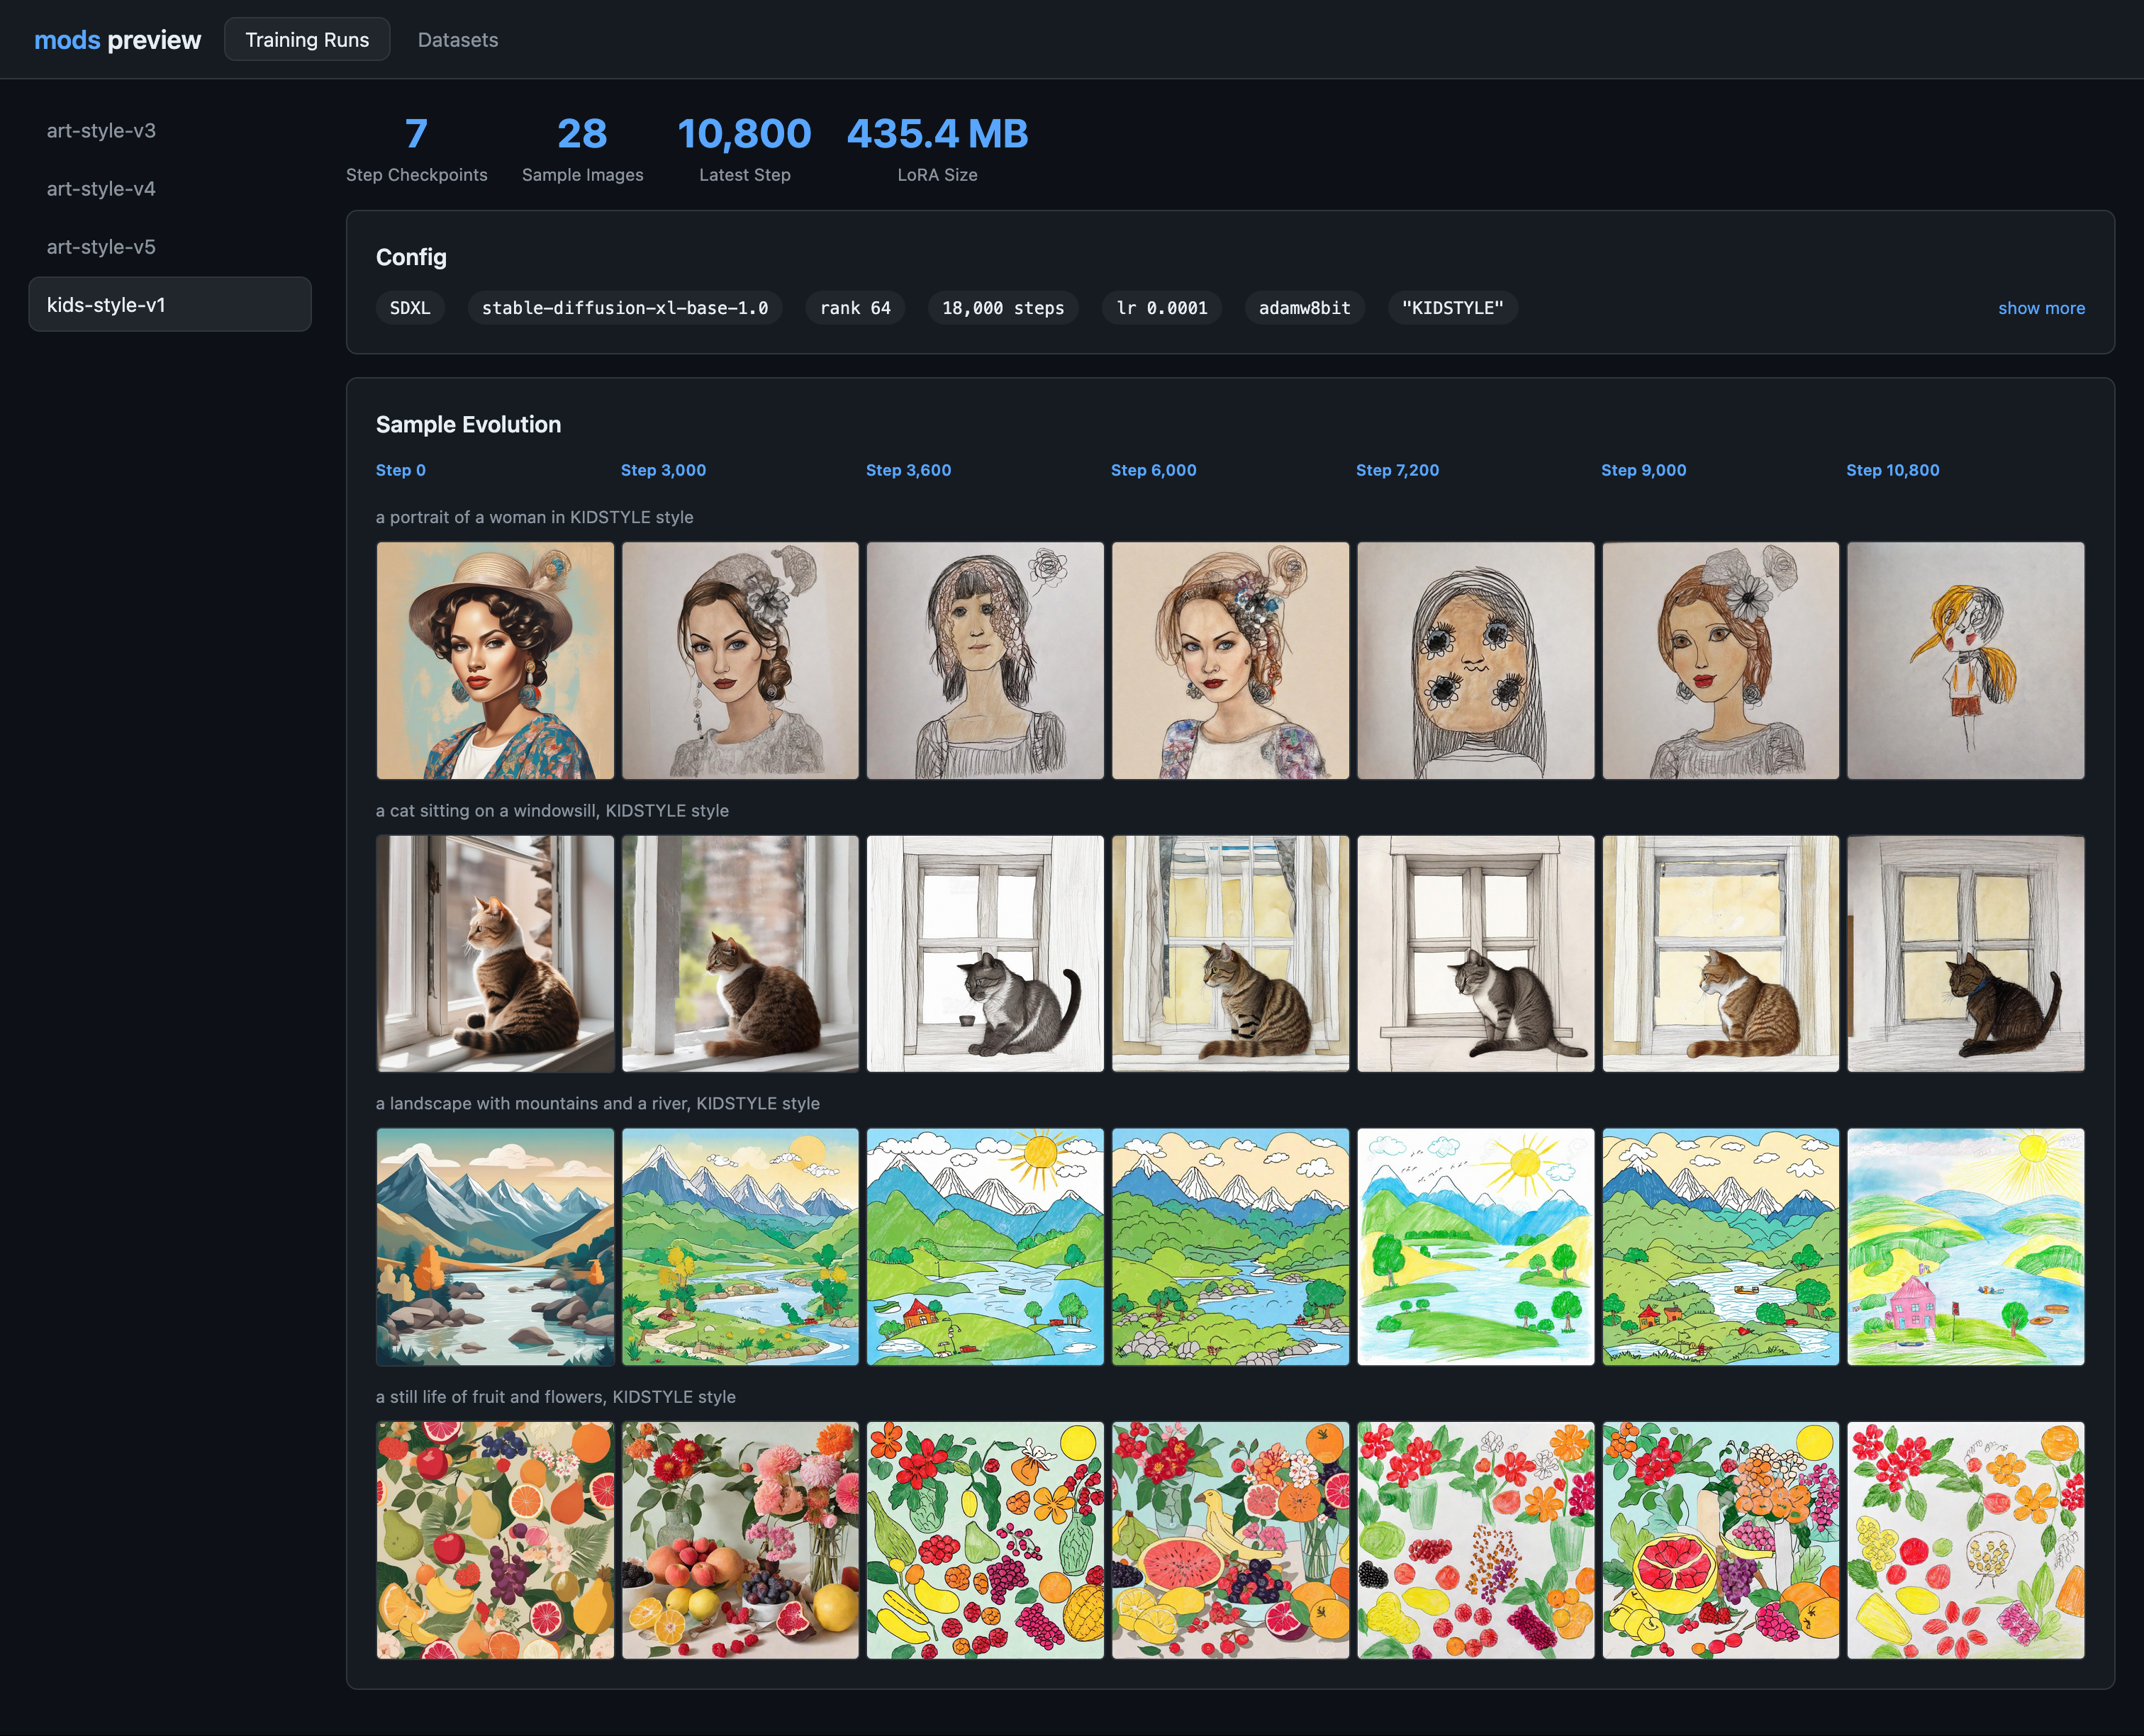
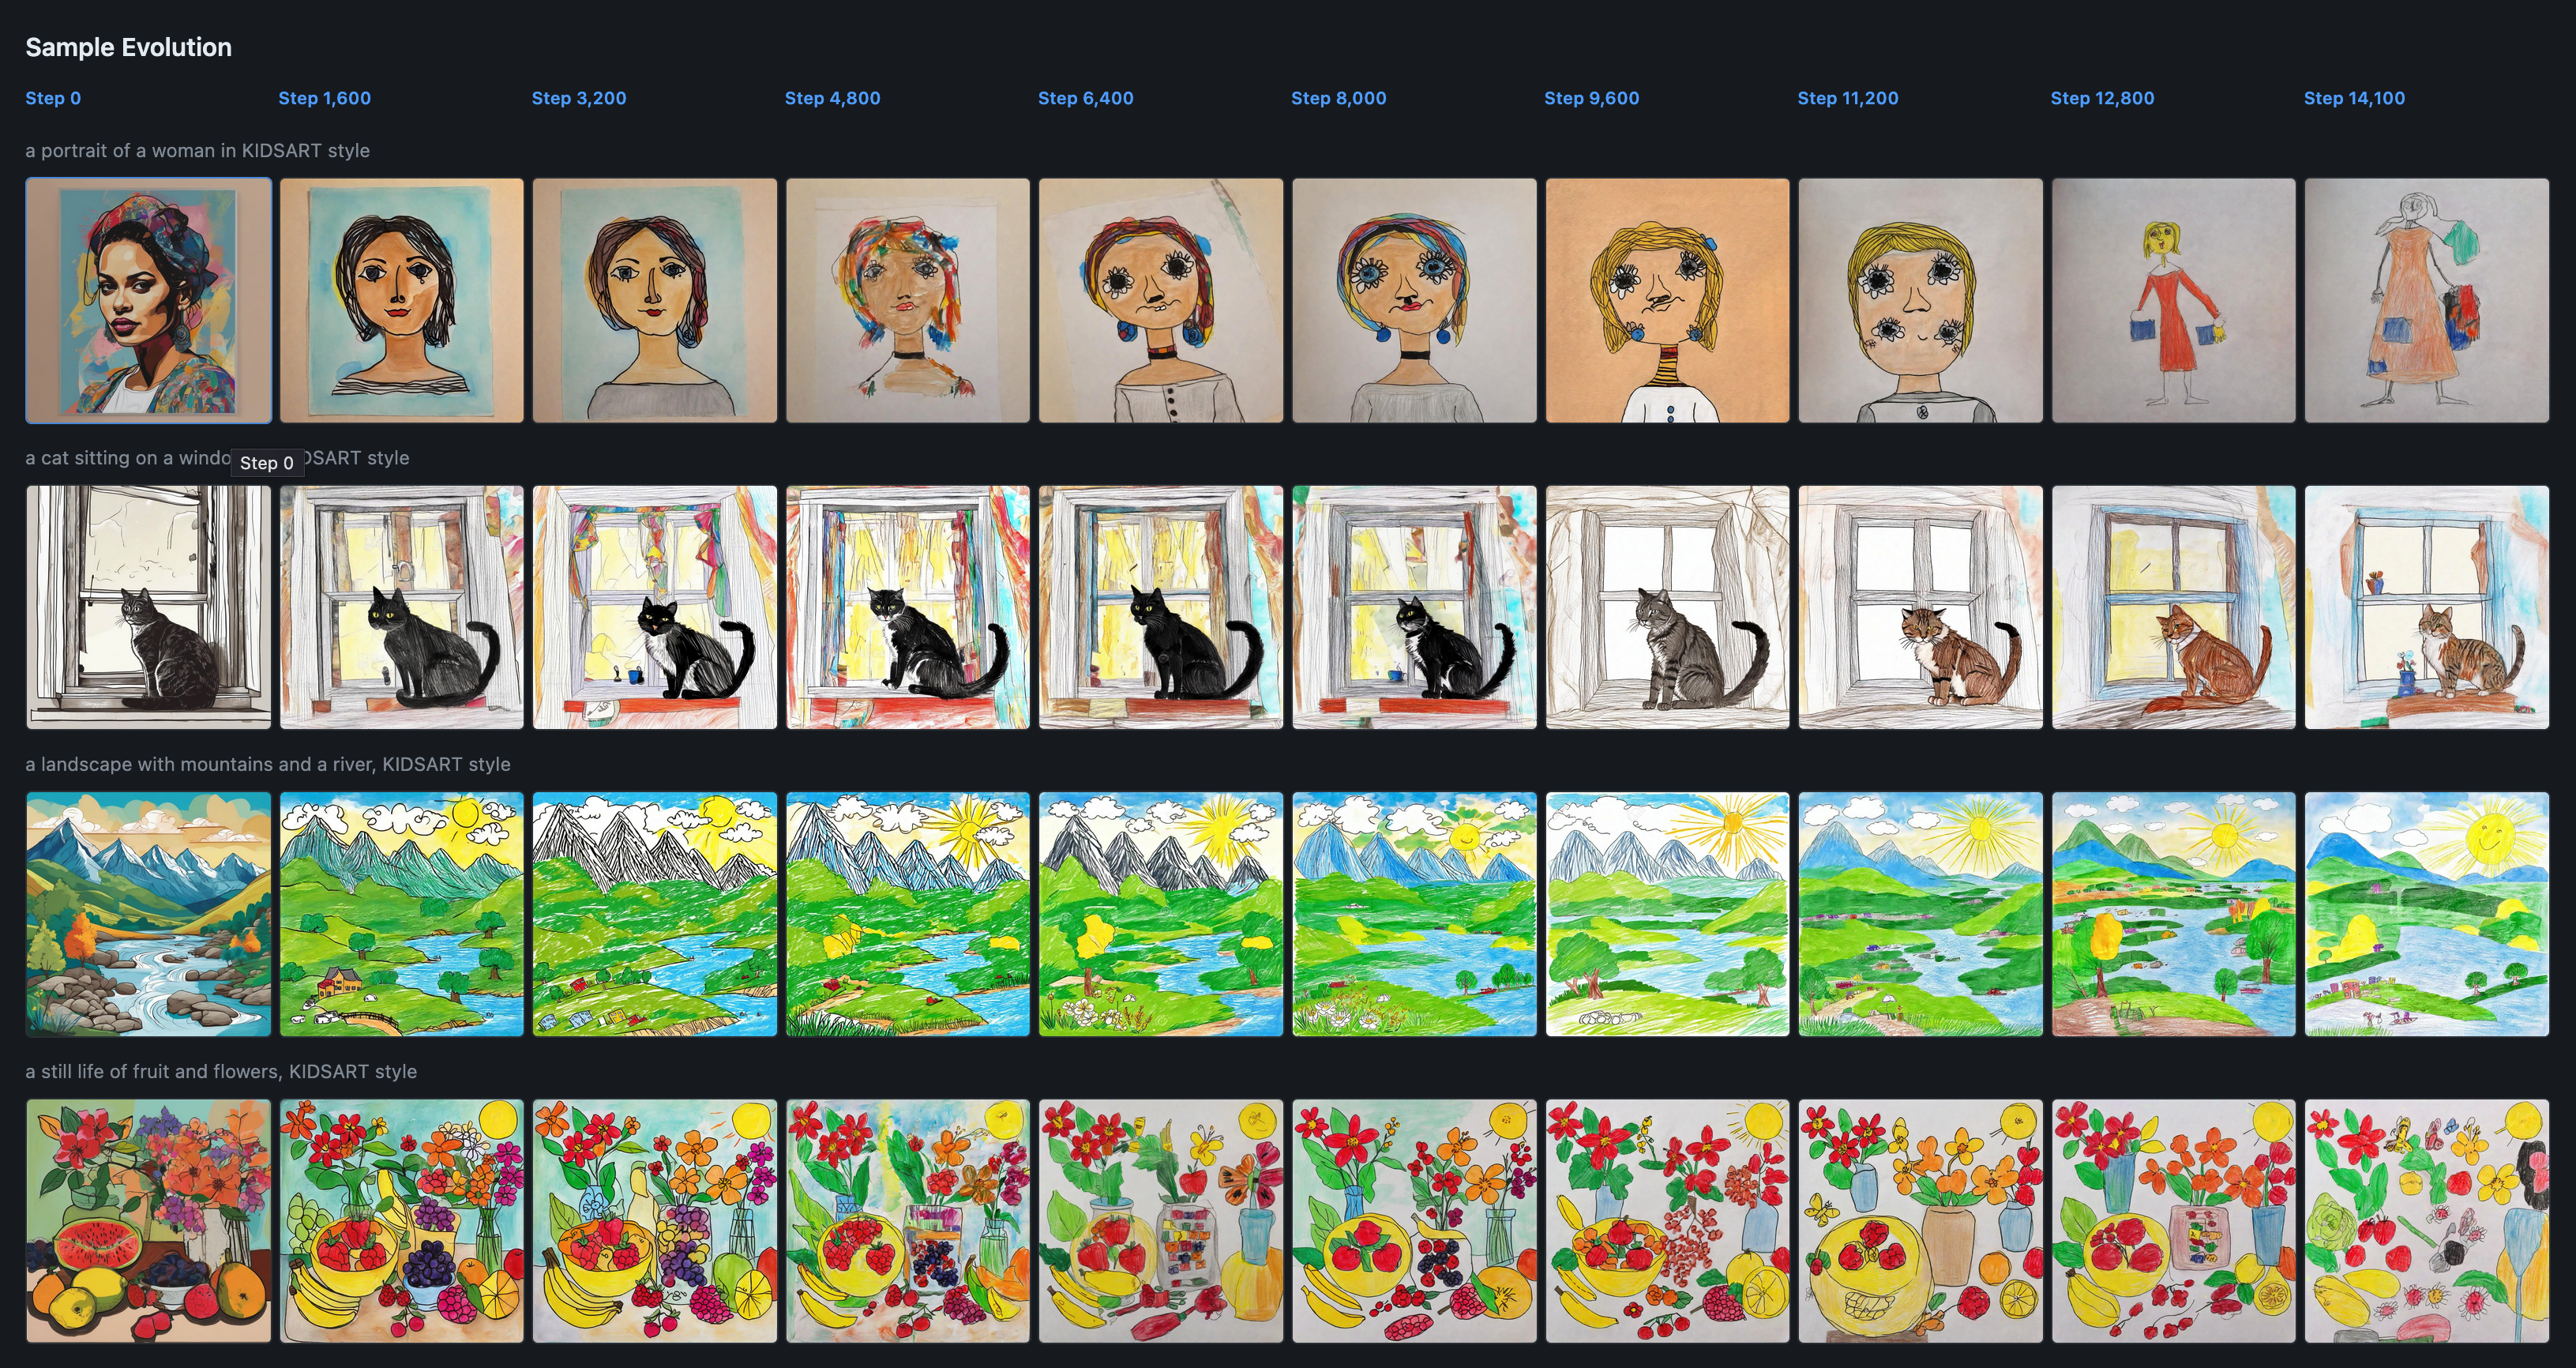
The kids-art dataset: 47 drawings across four emotion categories — happy, sad, angry, fearful. Diverse subjects, consistent style.
2. Caption your images
Captioning is where style LoRAs diverge from subject LoRAs. With a subject LoRA, you describe what the subject looks like. With a style LoRA, you describe what’s in the image without mentioning the style itself.
The --style flag tells the captioner to describe content, not appearance. Here’s what the captions look like:
Notice: no mention of “crayon”, “kid drawing”, “childlike”, or “pencil art”. Just the content. This is the key insight.
Why captions matter so much
This is the most important concept in style LoRA training. The caption tells the model what the text encoder should already handle vs. what the LoRA needs to learn. Get this wrong and your LoRA either doesn’t work or only works in narrow scenarios.
❌ Captions with style words
Results from a LoRA trained with style descriptors in the captions. The style only shows up when you explicitly prompt for 'kid drawing' or 'crayon art'.
What happens
- The model attributes the visual style to the words “crayon”, “kid’s drawing”
- The LoRA has less to learn — the text encoder already “explains” the look
- Result: the LoRA only activates strongly when you use those exact style words in your prompt
- Without the style words, the LoRA barely changes the output
- You’ve trained a “caption helper” not a style layer
✓ Good: Captions without style words
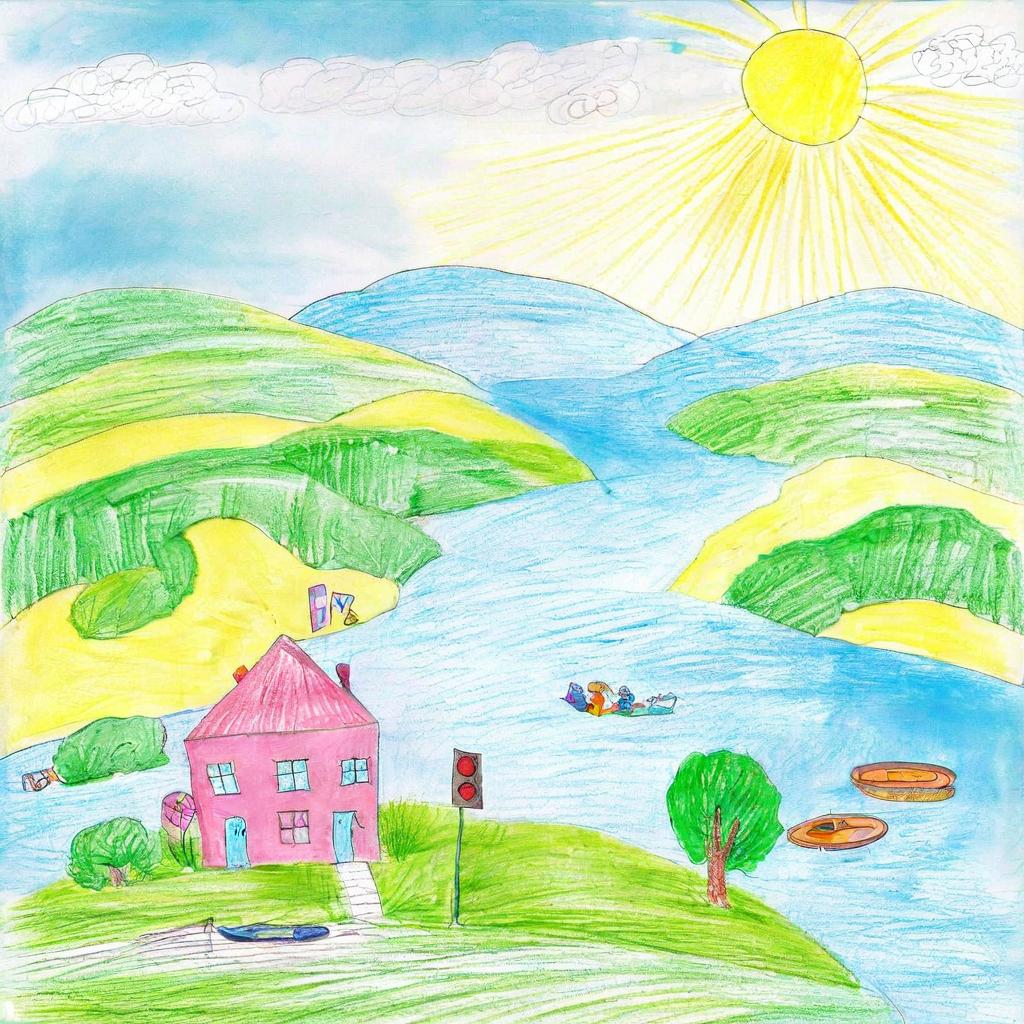
Results from a LoRA trained with content-only captions. The kids' art style applies to every prompt — even concepts nowhere in the training data.
What happens
- There’s a gap between what the caption describes (normal scene) and what the image looks like (crayon art)
- The LoRA must learn the visual difference — that’s the style
- The style becomes the LoRA’s “default lens” for everything
- Any prompt gets the style treatment — “a cyberpunk city” becomes crayon cyberpunk
- The trigger word (
OHWX) gives you an on/off switch
If the style is in the caption, the LoRA doesn’t learn it. If the style is not in the caption, the LoRA has to learn it. The gap between “what the text says” and “what the image shows” is exactly what the LoRA learns to fill.
This is why the --style flag exists in modl dataset caption — it instructs the vision model
to describe content only, stripping out any style descriptors. You can manually review and edit the .txt files
alongside each image if you want finer control.
3. Train the LoRA
With the dataset captioned, training is a single command. modl handles the Python runtime, ai-toolkit configuration, and VRAM optimization.
Let’s break down what modl chose and why.
Understanding the training presets
modl uses opinionated presets to calculate training parameters. For this run (47 images, style type, SDXL, Standard preset), the math works out as:
Preset comparison for style LoRAs (SDXL/Flux)
Start with Standard. If you’re experimenting and want fast iteration, use Quick (add --preset quick).
Advanced is for large, diverse datasets where you need the model to absorb more variation.
Steps/image varies by architecture
The 170 steps/img number is for SDXL and Flux. Other architectures converge differently:
4. Preview your results
Generate a quick preview to see what your LoRA learned.
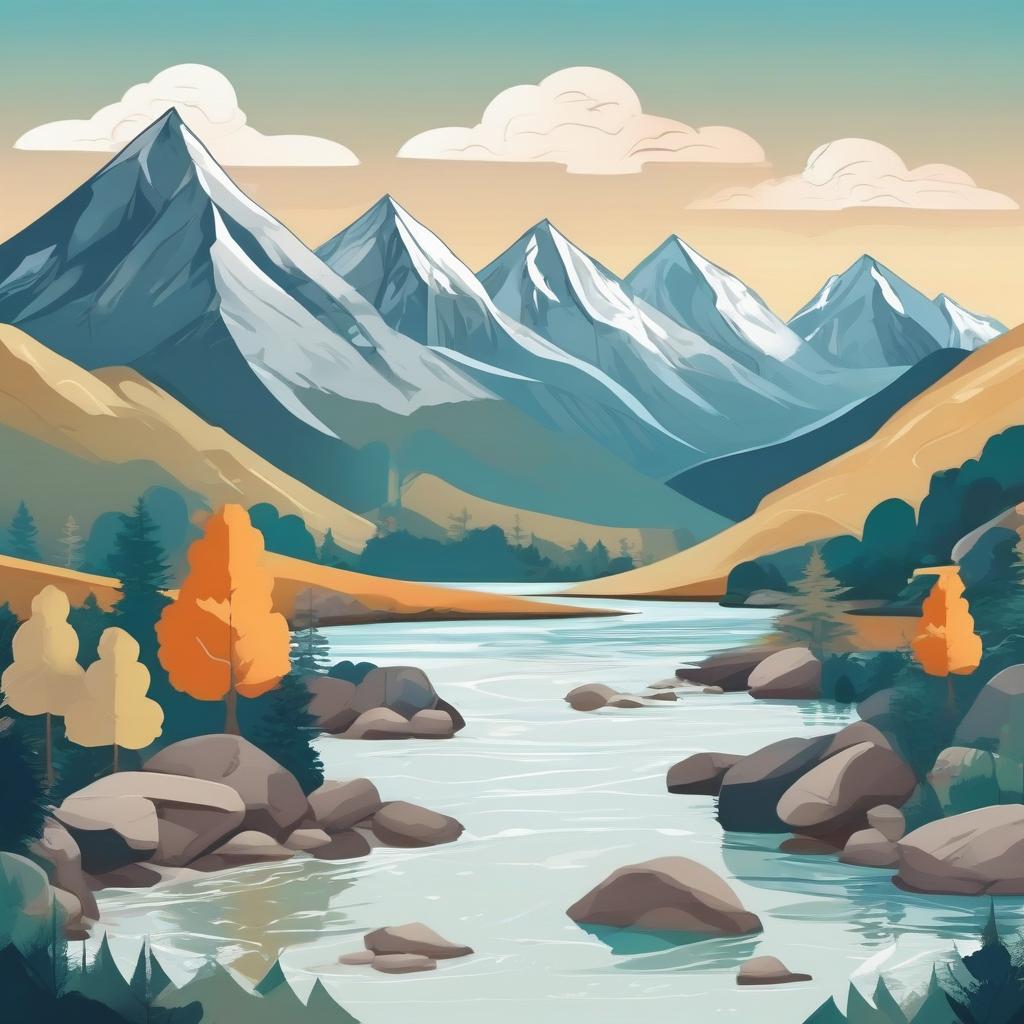
The prompt describes a scene the model has never seen in the training data — but the output should still have the crayon art style. That’s how you know the LoRA captured style rather than content.
5. Evaluate your LoRA
A trained LoRA is a starting point. Now test it systematically.
Find the sweet spot strength
The LoRA weight controls how strongly the style applies. Try the same prompt at different weights:
You’ll probably find 0.6–0.9 is the most usable range.
Check for overfitting
Test prompts that are far from your training data. If they still get the style while keeping the concept readable, your LoRA is solid:
Good sign: The concept is clearly identifiable but rendered in crayon style. Lines are wobbly, colors are bright and flat, textures look hand-drawn.
Bad sign: Every output looks the same regardless of prompt, faces/shapes collapse into similar blobs, or the LoRA only works with specific prompt words.
Stress-test composition
Try prompts with clear structural requirements:
Style LoRAs (especially children’s art) often break text rendering and precise layout. Seeing how it breaks tells you what to improve — better captioning, more dataset variety, or adding ControlNet for structure.
6. Experiments to learn more
Once your first LoRA works, these experiments teach you the most about how training parameters affect output.
Find where training should’ve stopped
Style typically locks in around ~60–70% of total steps. The later steps add refinement but risk making outputs same-y. For our 8k run, that’s around steps 4,800–5,600.
Try re-training with fewer steps and compare:
Often the earlier checkpoint is more flexible — less overfit, works with more diverse prompts.
Two variants to compare
These two re-trains teach the most about rank and steps tradeoffs:
Variant A — More flexible
Lower capacity, earlier stopping. Produces subtler, more adaptable style that blends well with other LoRAs and detailed prompts.
Variant B — Stronger stylization
More capacity, longer training. Stronger style takeover, but may lose flexibility on compositionally complex prompts.
Mix with another LoRA
A good test of whether your LoRA acts as a “true style layer” — combine it with a subject LoRA:
- Your kids LoRA at 0.6–0.9 weight
- A subject LoRA (cats, spaceships, architecture) at 0.2–0.5 weight
If the subject comes through clearly but rendered in kids’ style, you have a clean style LoRA. If everything gets overridden, try lowering the weight or re-training at lower rank.
Quick reference
The full workflow
Key rules for style LoRAs
- Never put the style in captions. Use
--styleflag or manually write content-only descriptions. - Diverse subjects, consistent style. 30–60 images showing different things in the same style beat 200 images of the same subject.
- Start with Standard preset. 170 steps/img at rank 64 with 1e-4 LR is a solid baseline for SDXL/Flux.
- Test at 0.6–0.9 weight. Full weight (1.0) is often too strong for style LoRAs.
- Test far-from-dataset prompts. The best style LoRAs transform any subject, not just ones similar to training data.